Quantcast
Channel: ntopng – ntop
Viewing all 209 articles
Browse latest View live

Combining System and Network Visibility using nProbe and Sysdig

$
0
0

Introduction


When in 1998 we have started the development of the original ntop, there were many Unix tools for monitoring network traffic: ping, tcpdump, netstat, and many others. Nevertheless we have decided to develop ntop, because there was no tool able to show on a simple way what was happening on our network. Early this year we have started the development of some experimental PF_RING kernel module extensions able to give ntop applications visibility of process activities, this in order to bind network traffic with a process name. We have lived once more the early ntop days when last May our friends at Draios have introduced sysdig and made all this mess below history.

System Monitoring Tools

We have therefore put our experimental code in the trash and started hacking on top of sysdig.


Our Vision: Combine System with Network Information


The idea is very simple: we want to associate a process name with every network activity, and monitor the process resources  (CPU, memory and I/O) used to carry on such activity. With flow-based paradigm what we see is depicted below.

Pre-sysdig

In essence we see hosts, ports, protocols and flows, but we lack visibility on the process that did all that. This has been the driving force to combine system with network monitoring, so that when system administrators see an increase in HTTP application response time, they can:

  1. Get the list of all the processes that were running when such HTTP request was served.
  2. Know what system resources were used by the process that served such request while serving such request (and not since process startup).

In essence we want empower system administrators and let them know what is happening on their system, also from the security point of view. You can finally know what is the name of the process that sent the packet-of-death so that you can find it on the system and neutralise it. As we’ve been playing with network flows for more than a decade, we believe that we can apply the same principle to system processes, by modelling them similar to flows.

In order to achieve all this we have extended our flow probe nProbe with sysdig, by developing a new process monitoring plugin that implements new information elements that can be exported via NetFlow/IPFIX or JSON to ntopng and other applications. The big challenge has been to monitor the system while keeping the CPU utilisation low, as busy systems can produce a lot of system events; for this reason we have implemented event filters so that nProbe analyses only those events that are necessary to carry on the job, while discarding the others inside the kernel (i.e. they are not sent by sysdig to the user-space app at all). The new information elements include:

[NFv9 57640][IPFIX 35632.168] %SRC_PROC_PID                Src process PID
[NFv9 57641][IPFIX 35632.169] %SRC_PROC_NAME                    Src process name
[NFv9 57844][IPFIX 35632.372] %SRC_PROC_USER_NAME               Src process user name
[NFv9 57845][IPFIX 35632.373] %SRC_FATHER_PROC_PID              Src father process PID
[NFv9 57846][IPFIX 35632.374] %SRC_FATHER_PROC_NAME             Src father process name
[NFv9 57855][IPFIX 35632.383] %SRC_PROC_ACTUAL_MEMORY           Src process actual memory (bytes)
[NFv9 57856][IPFIX 35632.384] %SRC_PROC_PEAK_MEMORY             Src process peak memory (bytes)
[NFv9 57857][IPFIX 35632.385] %SRC_PROC_AVERAGE_CPU_LOAD        Src process avg load (% * 100)
[NFv9 57858][IPFIX 35632.386] %SRC_PROC_NUM_PAGE_FAULTS         Src process num pagefaults
[NFv9 57865][IPFIX 35632.393] %SRC_PROC_PCTG_IOWAIT             Src process iowait time % (% * 100)
[NFv9 57847][IPFIX 35632.375] %DST_PROC_PID                     Dst process PID
[NFv9 57848][IPFIX 35632.376] %DST_PROC_NAME                    Dst process name
[NFv9 57849][IPFIX 35632.377] %DST_PROC_USER_NAME               Dst process user name
[NFv9 57850][IPFIX 35632.378] %DST_FATHER_PROC_PID              Dst father process PID
[NFv9 57851][IPFIX 35632.379] %DST_FATHER_PROC_NAME             Dst father process name
[NFv9 57859][IPFIX 35632.387] %DST_PROC_ACTUAL_MEMORY           Dst process actual memory (bytes)
[NFv9 57860][IPFIX 35632.388] %DST_PROC_PEAK_MEMORY             Dst process peak memory (bytes)
[NFv9 57861][IPFIX 35632.389] %DST_PROC_AVERAGE_CPU_LOAD        Dst process avg load (% * 100)
[NFv9 57862][IPFIX 35632.390] %DST_PROC_NUM_PAGE_FAULTS         Dst process num pagefaults
[NFv9 57866][IPFIX 35632.394] %DST_PROC_PCTG_IOWAIT             Src process iowait time % (% * 100)

Thanks to this new plugin it is possible to know for each flow peer the process name/PID/father-PID/memory/IO/CPU used during the duration of the flow. As this information is exported on a standard format, all flow collectors on the market can use nProbe generated flow to enhance their monitoring experience. However we have decided to do something special in ntopng to make system information a first class citizen.

Running the System


You can find binary, ready-to-use packages at

that you can install via apt-get or yum depending on your platform: you need to install nprobe, pf_ring and ntopng. Also remember that the sysdig kernel module must be loaded prior to run the system (i.e. do “sudo modprobe sysdig_probe”).

In order to activate system+network monitoring, you can start nProbe v7 (flow probe) as follows

nprobe -T “%IPV4_SRC_ADDR %L4_SRC_PORT  %IPV4_DST_ADDR %L4_DST_PORT %IN_PKTS %IN_BYTES
%FIRST_SWITCHED %LAST_SWITCHED” %TCP_FLAGS %PROTOCOL @PROCESS@ %L7_PROTO --zmq “tcp://*:1234”
-i any --dont-drop-privileges -t 5 -b 2

then start ntopng (flow collector – you need to use 1.2.1 or the code currently in SVN) as follows (note that you can merge process information coming from various hosts onto the same ntopng interface so that it is automatically merged):

ntopng -i tcp://nprobe1.ntop.org:1234,tcp://nprobe2.ntop.org:1234 …

At this point ntopng is ready to combine system with network activities as shown below. Note that as nProbe has visibility restricted to local system events, you need to install it on each system on which you want to have system visibility.
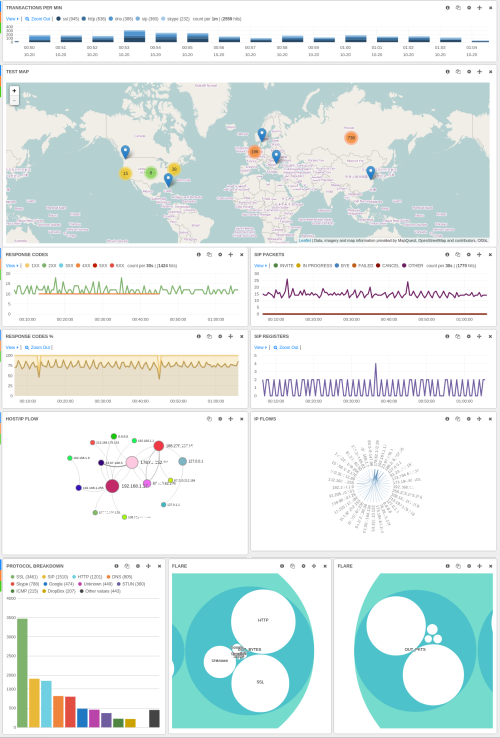
Click to view slideshow.

Visualising Flows and Processes on ElasticSearch/Kibana


If all this is not what you are looking for, we have also integrated ntopng with ElasticSearch, a flexible big-data system, that allows you to store flows on a distributed and replicated environment for long term historical analysis (just start ntopng adding -F es).

Click to view slideshow.

We are also developing custom dashboards built on top of Kibana, for letting you create in a few minutes your custom flow/process monitoring dashboard. Above you can find some sample dashboards.

What’s Next


At the moment we’re monitoring just processes that make network activities but the plan is to monitor all processes, regardless of them sending any byte on the wire. Furthermore we want to extend the ntopng process visibility with new reports to make processes/memory/users first class citizens.

Final Remarks


nProbe and the process plugin, as well ntopng are immediately available from http://packages.ntop.org packaged for CentOS and Ubuntu platforms. It is now time to really see what is really happening on your system going beyond the classic network flow monitoring paradigm.

If you want to learn more about this project, you’re welcome to attend the ntopng tutorial at the upcoming LISA 2014 conference that will take place next month in Seattle, WA.


Using ntop Applications with Docker and OpenStack

$
0
0

In order to ease the deployment of our applications, in addition to source code distribution, we have released binary packages (x64 and ARM) for CentOS/RedHat and Ubuntu/Debian. For PF_RING, that requires to be compiled against the installed kernel version, we have moved to DKMS so that you are no longer required to use the same kernel version we use for packaging it.

However the current trend is going towards virtualised environments (not just VMs such as VMware) and IaaS (Infrastructure as a Service) and thus we need to support them.


Docker


In essence there are two types of virtualisation:

  • Virtual Machine: emulation of a particular computer system, including its devices (network, storage, USB etc).
  • Operating-system level virtualisation: run multiple isolated user-space instances (often called containers) that look like a real server.

Docker is an open-source software that automates the deployment of applications inside software containers. Each container runs within a single Linux instance without the overhead of starting VMs. We have created a Docker container for ntopng (but others can be created for the other ntop apps) that allows you to run ntopng on a clean and isolated environment. We have built a dock on hub.docker.com

DockerHub

so that you can go to docker.com and search for ntopng Screen Shot 2014-11-04 at 13.26.03install it,

root@ubuntu:/home/deri# docker pull lucaderi/ntopng-docker
Pulling repository lucaderi/ntopng-docker
8077c18a90a8: Download complete
511136ea3c5a: Download complete
d497ad3926c8: Download complete
ccb62158e970: Download complete
e791be0477f2: Download complete
…
e072f31bb2a5: Download complete
9e52f4c92f80: Download complete
ecc46895937f: Download complete
3a3f2545e225: Download complete
4f1229fadea7: Download complete
5b5364929cbf: Download complete
Status: Downloaded newer image for lucaderi/ntopng-docker:latest

then run it

root@ubuntu:/home/deri# docker run --net=host --name ntopng -t -i lucaderi/ntopng-docker ntopng -v
….
02/Nov/2014 12:55:20 [main.cpp:183] PID stored in file /var/tmp/ntopng.pid
02/Nov/2014 12:55:20 [HTTPserver.cpp:374] HTTPS Disabled: missing SSL certificate /usr/share/ntopng/httpdocs/ssl/ntopng-cert.pem
02/Nov/2014 12:55:20 [HTTPserver.cpp:376] Please read https://svn.ntop.org/svn/ntop/trunk/ntopng/README.SSL if you want to enable SSL.
02/Nov/2014 12:55:20 [HTTPserver.cpp:420] Web server dirs [/usr/share/ntopng/httpdocs][/usr/share/ntopng/scripts]
02/Nov/2014 12:55:20 [HTTPserver.cpp:423] HTTP server listening on port 3000
02/Nov/2014 12:55:20 [main.cpp:231] Working directory: /var/tmp/ntopng
02/Nov/2014 12:55:20 [main.cpp:233] Scripts/HTML pages directory: /usr/share/ntopng
02/Nov/2014 12:55:20 [Ntop.cpp:218] Welcome to ntopng x86_64 v.1.2.2 (r8539) - (C) 1998-14 ntop.org

The –net directive allows you to instruct ntopng to monitor all the host traffic and not just the container running ntopng.


OpenStack


OpenStack is a technology that allows to
deploy and control resources on a data
center (VMs, storage, networking). Our interest in OpenStack is manyfold:

  • Create an OpenStack VM image for enabling people to easily deploy ntop monitoring apps on datacenter.
  • Exploit ntop’s PF_RING open-source packet processing technology for bringing packets in 0-copy at 10 Gbit on a VM managed by OpenStack. This is to enable efficient traffic monitoring on a data center.

Through OpenStack we want to be able to deploy VMs with ntopng and attach them to virtual controllers (Open vSwitch) or 0-copy PF_RING ZC-based packet sources. With ZC, packets are captured in 0-copy from network adapters and deployed in 0-copy to VMs. ZC packets are deployed on the VM using virtual adapters attached dynamically to the VM though a ntop-developed kernel module based on PCI hotplug as described in this document. We have no interest, as many companies did, to accelerate Open vSwitch as for us:

  • This is just a way to communicate with the VM: nice if it’s faster, but the current Open vSwitch is good enough for carrying on activities such as flow-export or connect to the ntopng GUI via https.
  • We need to focus on what a VM can do in OpenStack, so that we can provide 10G line rate to the VM in RX and TX, with minor performance degradation with respect to the performance you can achieve on bare metal.

The good news is that we have prepared all you need to be productive immediately. If you’re an OpenStack user, we have create a VM image you can use for deploying our apps in minutes. You just need to download the OpenStack VM image, and place it onto your datacenter and create in minutes simple or complex topologies such as those depicted below.


OpenStack

OpenStackVMs


Click to view slideshow.


Final Remarks


Either you run ntop apps or PF_RING ZC on a physical machine, a container, or a OpenStack VM, we have created for you all the basic pieces you need. If you are running on a pure virtual environment, we also have the ability to monitor both your processes and your network using nProbe with Sysdig. In essence we have pre-built all you need for processing packets at high speed on both physical and virtual environments.

How to Enforce Layer-7 Traffic Policies Using ntopng

$
0
0

ntopng has been traditionally used to passively monitoring network traffic. However as years ago  IDS (Intrusion Detection System) became mature products and eventually became IPS (Intrusion Prevention System), it was time to add inline traffic capabilities in ntopng. This post gives you s sneak preview of this new feature (still under development) that will be included in the upcoming ntopng release. The idea is to combine network traffic monitoring with traffic enforcement so that you can use ntopng not just for monitoring your users (or your children if you are on a home network) but also for making sure they don’t misuse network access with per-host/network protocol policies.

The video below shows how nDPI can be used within ntopng to enforce a specific traffic policy (in the video how to drop Skype traffic for a specific host).

In ntopng you now have the ability to specify an interface whose name is bridge:ethX,ethY (example “bridge:eth1,eth2”) that means ntopng will bridge the traffic from the two interfaces and make sure only the allowed traffic can flow across the interfaces. When using the bridge interface, ntopng shows you in the host view the list of blacklisted protocols for a given host (note that blacklist can be specified not just per-host, but also per-network or as a global policy for everyone).

Host Traffic Policy

Clicking on the “Modify Host Traffic Policy” button the form below is displayed. Here network administrators can move the supported nDPI protocols (over 170 to date and include popular protocols such as Skype, WhatsApp or YouTube) from the two lists: whitelist means that the protocol can flow, blacklist means that ntopng will drop the protocol traffic.


Layer 7 Policy Selector


If you look at the list of flows, unwanted traffic is represented with a strikethrough style (in the example below the DropBox traffic is dropped) whereas legitimate traffic is reported as usual.


Dropped Flow

This feature is implemented on top of PF_RING ZC on Linux or over pcap for non-Linux hosts (Windows and OS X for instance). This tool is designed to run non fast multicore systems as well on low-end devices such as Raspberry Pi/BeagleBoard or Ubiquity routers. Leveraging on PF_RING ZC, ntopng can operate at line rate at 1 and 10 Gbit. In the latter case it is necessary to enable RSS in the NIC (use ethtool to instruct the NIC to hash traffic based on host IPs) and open several bridge interfaces in ntopng so that it can process the various interface queues in parallel.

As previously stated this feature will be included in the next ntopng release. While the code is working reliably, we need to further polish the configuration of policies and perhaps introduce extra features such as per-host/traffic bandwidth enforcement (i.e. host X cannot send more than Y pps/Mbps). This said it won’t take too long before we release it.

Stay tuned!

Moving towards ntopng 2.0

$
0
0

As you know, our plan is to release ntopng 2.0 later this spring. While we are still coding the last missing features, we have start packaging the tool so that you can start testing it. We have decided to create two versions of ntopng:

  • Community edition: free open-source version, that you can use at no cost.
  • Professional version: fee-based version, that includes features useful in companies. Of course this version will be free of charge for educations and universities as with all other ntop commercial products.

There will also be two binary ntopng editions (you can still compile the code from source) available on the ntop packages web site:

  • Standard: x64 packages for CentOS and Ubuntu server (same as today).
  • Embedded: packages for embedded platforms such as MIPS and ARM, so that you can use them on your favourite embedded box.

All the binary packages we are building contain the pro version that can be used in community mode starting it as “ntopng –community”.

The list of new features is very long and counting. We will start publishing news very soon. In the meantime for all those interested in understanding the direction where we are going, I suggest you to have a look at the presentation we made this week at Cebit.


Using ntopng (pre) 2.0 on a Ubiquity EdgeRouter

$
0
0

As the release of ntopng 2.0 is around the corner (we are fixing the last bugs, polishing the GUI and writing some documentation), we want to show how to turn a cheap device such as the Ubiquity EdgeRouter into a traffic monitor and layer-7 policy enforcer as depicted below.Ubiquity

NOTE: if you bridge traffic using ntopng, please make sure you do not create loops. A typical mistake is to connect eth1 and eth2 to a switch: don’t do that as otherwise a loop will be created.


Step 1: Get Your Router

Buy an Ubiquity EdgeRouter. We use the EdgeRouter Lite model (others will work too) that is cheap, and it has three Gigabit ports.


Step 2: Setup the Router

The first time you play with the router you should configure the package repositories so you can use the EdgeRouter as a embedded PC and for instance install the basic packages for compiling ntopng onto the router (in case you want to develop on it). The steps are listed at this URL

If you want to compile ntopng you need to install the packages below (needed also at runtime if you install the ntopng binary package).

root@ubnt# apt-get install libpcap-dev libtool rrdtool librrd-dev autoconf automake autogen redis-server wget libsqlite3-dev libgeoip-dev libcurl4-openssl-dev


Step 3: Install ntopng

If you do not want to compile ntopng yourself, you can install redis-server (prerequisite for ntopng) and ntopng/ntopng-data using the packages available at the ntop packages repository. Once you have downloaded all the packages you can do:

root@ubnt# dpkg -i redis-server_2.4.15-1~bpo60+2_mips.deb 
root@ubnt# dpkg -i ntopng_1.99.150322-9208_mips.deb 
root@ubnt# dpkg -i ntopng-data_1.99.150322-9208_all.deb


Step 4: Start ntopng

If you want to use ntopng for monitoring traffic flowing on eth1, you can start it as “ntopng -i eth1“. Instead if you want to use ntopng to bridge eth1 and eth2 interfaces, you need to start it as “ntopng -i bridge:eth1,eth2”. Remember to start redis-server prior to start ntopng. If you want to make this configuration persistent you can create a file named /etc/ntopng/ntopng.conf so that you can start ntopng as a service. It is now time to connect via HTTP to http://my_ubiquity_router:3000 and enjoy ntopng.

Finally, make sure you configure ntopng to avoid using all the (little) disk space available on the device. So you should consider disabling RRD generation for hosts for instance, or refrain from dumping flows on disk (better to send them to a remote ElasticSearch instance).

ntopng Deep Dive: Interview with Ivan Pepelnjak

$
0
0

Last month Ivan Pepelnjak interviewed me on Software Gone Wild about ntop and ntopng.

The main topic of the interview were:

  • How it all started and why did Luca decide to start the ntop (and PF_RING) project?
  • What is ntopng (next-generation ntop) and why did they rewrite the product?
  • What are nprobe and nbox?
  • The distributed architecture of ntopng, including probes, data sources, collectors, and the central analyzing engine;
  • Combining ntop and elastic search;
  • Why it makes sense to convert all data into JSON format?
  • What are the problems of 40GE packet capture?
  • How can you do high-speed DDoS prevention with ntopng?

You can read the whole interview and listen to the podcast . Be prepared as there will be a part II on PF_RING.

Say hello to ntopng 2.0

$
0
0

After 9 months of development, we are pleased to announce the release of ntopng 2.0. This is a major release as we have reworked many application components and made the application robust and usable by mid/large companies and ISPs. We have created two versions of ntopng:

  • Community edition: this is the standard ntopng that you can use free of charge and that implements a robust and easy to use web-based traffic monitoring application.
  • Professional edition: an enhanced version of ntopng that includes modern reports and many new features listed below on this article. This edition is available at a little free that we can use to hire people to better serve all the ntop community. Note that we have created a cheap embedded/professional edition of ntopng usable on ARM-based (e.g. Raspberry PI and BeagleBoard) and MIPS-based (e.g. Ubiquity Networks EdgeRouter) boxes.

As of ntopng 2.0, the binary Windows version of the ntopng community (remember that the code base is the same for Unix and Windows) is free of charge: we want ntopng to be pervasive across platforms. All binary packages are work in professional edition for 10 minutes, and then switch back to the community edition: this allows you to see what is different in the professional edition.

The main new features of ntopng 2.0 include:

Professional Edition

  • Dynamic dashboard that includes a realtime view of traffic.
  • PDF-printable reports including top hosts/activities/protocols.
  • Ability to operate in inline mode and thus implement a layer-7 firewall (even on low-end embedded boxes) and traffic shaper (yes we can drop traffic and assign to hosts a bandwidth to avoid them to monopolise the traffic).
  • All graphs are rendered in a pretty way with zoomable (in and out) drill-down facility.
  • Per-minute accurate reports (in JSON format) of top X activities so that users can use them to generate further traffic reports in addition to all those included in the pro version.
  • Added SNMP support for visualising MIB-II host information through the ntopng web interface.

Community Edition

  • Moved the code to GitHub for easier collaboration.
  • Fixed several bugs present in the previous version.
  • Added continuous testing tools (Travis-CI) and automatic regression testing (via Travis) for improving code quality.
  • Added ability to aggregate traffic from various network interfaces on the same interface view while keeping interface traffic split. Example ntopng -i eth1, -i eth2 -i view:eth1,eth2
  • Added support for the latest nDPI that includes support for various new protocols (e.g. QUIC) and new versions of existing ones (e.g. Skype). nDPI is also used to drop application traffic in the professional noting edition.
  • Hardened the code to support mid/large organisations and high traffic volumes, as well for operating on hosts with little memory.
  • Added network latency in flows (server vs client network latency).
  • Added flow TCP traffic statistics (packets retransmitted, lost, and out of order).
  • Enhanced HTML code to render better on devices of various sizes.
  • Enhanced host alerts (including traffic quotas) and added interface alerts. You can now for instance generate traffic alerts when an interface has too much traffic or if a host has passed its daily traffic quota.
  • Ability to sniff from netfilter interfaces
  • Improvements on OS detection of remote hosts.
  • Alerts are now generated when ntopng detects a flooder or a network scanner (as well when accessing malware sites [-c plugin])
  • Integration of ntopng with nagios: you can now create nagios plugins to query ntopng and thus emit alerts based not traffic conditions.
  • Ability to categorise malware (-c option) using the Google Safe Browsing API that replaces the block.si service present in ntopng 1.x.
  • Packaging for Intel, ARM and MIPS platforms.
  • Added ability to fine-tune RRD configurations.
  • Added ability to generate a traffic report for all hosted HTTP servers (on local networks): ISPs can now create a hourly report of all the thousand of servers they are hosting.
  • Ability to work behind an HTTP reverse proxy.
  • Enhanced the ElasticSearch export facility to cope with latest additions such as host geolocation.
  • Added support for NUMA core affinity.
  • Enhanced host GeoIP location.
  • Various fixes to the historical network interface.
  • Added reports per AS, geo-location, network, HTTP servers.
  • Added per-network RRDs.
  • Fixed various bugs including a memory leak that was slowly exhausting memory.
  • Added several fixes for enhancing security and preventing ntopng to be misused (from the security point of view).
  • Added ability to disable HTTP authentication (partially or fully).
  • ntopng can now be queries via HTTP tools such as curl or wget with authentication enabled.
  • Added ability to dump specific traffic (e.g. of a selected host) or when specific traffic conditions arise (e.g. too much traffic) on a tap interface and attach applications such as Wireshark/tcpdump to it. Similarly added ability to dump traffic to disk in pcap format.
  • Added HTTP virtual hosts support in HTML reports.
  • Added ability to send data in Lua using UDP (for instance you can use it for exporting metrics to Graphite).
  • Added experimental InfluxDB export (disabled by default as ‘as of today’ InfluxDB is not yet production ready).

Please do not forget to star ntopng on github if you like this project!


Links:

Exploring your traffic using ntopng with ElasticSearch+Kibana

$
0
0

ntopng allows you to export monitoring data do external sources. For low-traffic sites, SQLite and the ntopng historical interface can be a good option. As your traffic increases you are forced to put your data on a database if you care about performance and long-term data persistency.
In future ntopng versions we will add support for additional databases, but for the time being we decided to start with the ELK (ElasticSearch + LogStash + Kibana) paradigm. In this case ElasticSearch (ES) is the database backend, and Kibana the GUI used to report data. As ntopng is able to natively export data in ElasticSearch, we do not need to use LogStash at all.

Supposed you have installed your ElasticSearch and Kibana instance on host XYZ (that can very well be the same host where ntopng is running) all you need to do to start data export is to start ntopng as follows:

ntopng -F “es;<ES Index Type>;<ES Index Name>;<ES URL>;<ES pwd>”

so something like this should work for most of you

ntopng -F “es;flows;ntopng-%Y.%m.%d;http://XYZ:9200/_bulk;”

In ES parlance an index is what a table is on a relational database. In order to avoid putting all data in a single index (ES can harvest old data with you by configuring the data retention), ntopng will create a daily index automatically for you by using the index name specified on the command line. By default (unless you configure it) ES does not use a password to protect data, so you can leave the password field blank. Make sure that you do not change the /_bulk/ URL as ES likes it that way (of course you can change the host name and port).

Once started, ntopng will push ES flows that are expired or periodically send (every 5 mins) partial flows for long lasting flows. By connecting to Kibana using a web browser you can immediately start seeing incoming flows appear in realtime.

ntopng and Kibana

You can click on each individual flow and display all the flow attributes

Flow attributes

Now it is time you to create a custom dashboard and report you data on a graphical interface.

A good starting point is Qbana, a github project designed to display monitoring data produced by ntopng/nProbe using Kibana

Qbana


We would be delighted if ntop users could contribute with Kibana dashboards that we could share inside the community. So please be generous and send us your contribution that we’ll then share with the ntop community.


Lessons learnt at #SharkFest15

$
0
0

Last week we have made a couple of presentations at SharkFest 2015, introducing to the Wireshark community what ntopng is about. The most interesting part has been the feedback of those who attended the talks who commented on “how to integrate ntopng with Wireshark”. My personal conclusion is that the best way of doing this, is to turn ntopng into a pre-processor for Wireshark; namely use ntopng to permanently monitor a network, detect anomalies, and then analyse them with Wireshark. In fact a packet sniffer cannot be used as a permanent monitoring tools, as it requires human supervision and expertise to use it and interpret results. On a large network for instance, it is unlikely that Wireshark can be deployed permanently in all the places in order to report packet anomalies, as this tool has not been designed for this task.

In ntopng 2.0 we have added the ability to both dump traffic on disk in pcap format, and create tap interfaces (remember to start ntopng with –enable-taps so that ntopng can create them) to which you can attach Wireshark.

Packet Tap


This allows ntopng to stream Wireshark packets in realtime for specific hosts/flows or for specific events (e.g. a portscan).

Live Streaming to Wireshark

The wireshark community has asked to make this mechanism even more flexible. Packet-oriented people like to see low-level details such as TCP window size that monitoring folks (such as most ntopng users) do not usually care about. What it has been asked is to make ntopng scriptable and decide via a lua script when a specific flow needs to be streamed to a tap/saved to a pcap file. For instance we have been asked to let users decide based on various conditions such as for instance if the TCP window scale exceeds a given value or if drops are more than a certain threshold. In essence turn ntopng into a more sophisticated Wireshark packet pre-processor.

The second feedback received is to add in ntopng the ability to report about specific low-level details such as the TCP window scaling value or the backlog of in-ACKed packets on a TCP connection.

We are planning to implement these things in the coming months. However if you have further ideas or requirements, please file an issue on GitHub so that we can track it and make ntopng even better than what it is today. Thank you!

Using ntopng to Implement a WiFi Access Point with Layer 7 Traffic Enforcement

$
0
0


This post will teach you how to create a cheap WiFi access point able to enforce layer-7 application protocols. In order to do this you can use a cheap RaspberryPi or BeagleBoard with a USB WiFi stick, or use a x86 PC.


beagleboard

The USB stick we use is the following

# lsusb
Bus 002 Device 003: ID 148f:5370 Ralink Technology, Corp. RT5370 Wireless Adapter

and once plugged onto a USB port it is immediately recognised by Linux (in this post we use Ubuntu Linux but other distro will work as well). As described in this article, you just need to edit /etc/network/interfaces and add something like

allow-hotplug wlan0
iface wlan0 inet static
address 192.168.100.1
netmask 255.255.255.0

as well create your /etc/hostapd/hostapd.conf configuration file similar to ours

# cat /etc/hostapd/hostapd.conf
interface=wlan0
driver=nl80211
ssid=ntop
hw_mode=g
channel=6
macaddr_acl=0
auth_algs=1
ignore_broadcast_ssid=0
wpa=2
wpa_passphrase=ntop_password
wpa_key_mgmt=WPA-PSK
wpa_pairwise=TKIP
rsn_pairwise=CCMP

Done this we’re ready to start ntopng. Before doing that we need to
# ethtool -K wlan0 gro off gso of
# ethtool -K eth0 gro off gso off tso off

that prevents the network adapter to return to user-space packets large than the MTU (this is a problem because ntopng acts as a bridge and this it cannot transmit packets when they are larger than the MTU). It is now time to start ntopng that will act as a bridge between the wired and the wireless interface:

ntopng -i bridge:eth0,wlan0

Now the interfaces are bridged and wireless clients can connect to the Internet without restrictions.


Screen Shot 2015-08-03 at 22.48.56


We use a MacBook connected to the WiFi as a client and we want to prevent our notebook to do any Skype traffic. In order to do that we need to click on the host name, that displays host details.


Screen Shot 2015-08-03 at 22.49.13

Then click on the “Modify Host Traffic Policy” that opens a new page where the protocol to drop can be specified for this host.


Screen Shot 2015-08-03 at 22.49.34In the left panel, type Skype, then click on the right arrow to move the protocol under the black listed protocols list. In order to activate the configuration you need to click on “Set Protocol Policy and Shaper”.


Screen Shot 2015-08-03 at 22.50.40


As soon as Skype is started, you will see Skype flows being identified by ntopng with a strikethrough font to highlight that the traffic is blocked. You can verify this because the Skype client on the notebook is unable to login onto the Skype network and thus calls and messages are disabled, while all the other protocols work as usual. This is just the beginning as you can add traffic shaping and much more. At any time you can check how much traffic has been filtered by ntopng by looking the the interface statistics under the ntop’s Interfaces menu.


Screen Shot 2015-08-03 at 22.51.04

Now you know how to use ntopng to enforce network traffic policies. Using the flexible configuration GUI, you can set default policies on your network (for instance block FaceBook for everyone) and add exceptions (don’t block FaceBook for PC x,y,z). You can do all the configurations using the ntopng web GUI without using any command line tool. Just a couple of reminders:

  • You can use ntopng as bridge with two (as just described) or three network interfaces. The only difference is that in two network interfaces mode, the WiFi client is unable to talk with the IP address of the wired interface (i.e. if you want to speak with the ntopng host, your wireless clients must contact the IP of the WiFi interface).
  • Two network interface bridging is available only on ntopng packages build on August 3rd 2015 or later.
  • ntopng bridging is available only in the pro version of ntopng, so make sure you have a license or that the demo mode is not yet expired.

Enjoy !


Exploring Historical Data Using ntopng

$
0
0

In the original ntopng it was possible to navigate historical information using a so called “Historical Interface”. Such interface was a logical network interface able to read flow data from a SQLite archive and present them on the web interface. This approach had various limitations when it was used to navigate data on a long term window, as all flows had to be restored on memory before visualising them, process that can take a lot of memory and time when data cardinality increases.

In the ntopng 2.1 development version, we have completely rewritten the code for historical data exploration. Currently the supported database backends include MySQL and ElasticSearch, so using the -F flag, you can dump flow information on one of these two backends. For instance if you want to use MySQL you just need to do

ntopng -i eth0 -F "mysql;localhost;ntopng;flows;root;"

and ntopng will save flow information in the database. Doing that, ntopng will also display you an extended web interface for navigating though flow information. You can select flows according to various criteria, by selecting the graph icon inside ntopng (local) host and interface pages.

Screen Shot 2015-10-11 at 10.13.04

As you can see at the bottom of the graph you will find a small table containing the top flows of selected time period you selected. This table is interactive as all ntopng tables so you can click on column names to sort data, or click on the Info button to visualise the flow information. All activities on this table are not performed on in-memory data but rather on historical data present on the database. For instance if you click on the www.internetfestival.it link under the Info column, you will select all flows which contain such string (e.g. DNS queries or HTTP requests from/to such host) as depicted below.

Screen Shot 2015-10-11 at 10.44.53

You can click on the search criteria to change the type of information you want to retrieve, and you will see the results in the table below. The middle table named “Search Results” contains a summary of the retrieved information so that you can narrow your search if necessary. In case you are interested in downloading all flows matching your queries, you can click on the bottom download icon to download all of them. On the current implementation you can easily drill down to flow level and see exactly what flow has created the suspicious traffic peak that you have seen in ntopng traffic graphs.

In order to avoid filling up your MySQL database, under the ntopng preferences menu, you can specify how long you want to keep flows into MySQL so that ntopng can delete for you old flows and thus you can save space. Note that this setting applies only to MySQL as RRD-based graphs are not affected but this setting. This means that you can use MySQL to store short-term flows, while using RRD-based graphs for more long-term analysis.

Screen Shot 2015-10-11 at 10.56.40


This implementation is just the beginning of what you will see after ntopng 2.2 release. In fact we plan to add data analytics that go beyond simple data search/retrieval, periodic reports and much more. If you want to contribute, please send us patches and code enhancements and we’ll integrate them.

ntopng 2.2 Just Released

$
0
0

After over 6 months of work, we’re pleased to announce the release of ntopng 2.2 (as already discussed even numbers identify stable releases whereas odd number development versions). The goal of this release has been to consolidate the existing work, fix issues reported by users, improve the reports we have introduced in 2.0 and pave the way for the next development iteration where we plan to add new features (we’ll present the roadmap in the next few weeks). The main new features of this release is the introduction of traffic profiles, new historical interface redesigned from scratch, various reports improvements, support of layer-2 traffic analysis,integration with NetFilter (Linux only).

Enjoy!

Changelog:

  • Implementation of BPF-based traffic profiles (similar to NFsen named filters) , logical flow-based aggregations — e.g., Facebook traffic originating at host X. Real-time statistics as well as historical data are collected for each traffic profile
  • Added a fine-grained network traffic breakdown that captures and stores ingress, egress, and inner traffic for each local network
  • Redesign of historical interfaces. Historical interface data have been seamlessly integrated with real-time data
  • Historical flow dump and runtime drill-down of historical data with support for MySQL and ElasticSearch
  • Built-in support for protocols:
    • CAPWAP (Control And Provisioning of Wireless Access Points, <https://tools.ietf.org/html/rfc5415>)
    • BATMAN (<http://www.open-mesh.org/projects/open-mesh/wiki/BATMANConcept>)
    • TZSP (TaZmen Sniffer Protocol)
  • Added SIP and RTP protocols information in flow details
  • Additional MAC-based host calassification
  • Added support for Linux TUN/TAP devices and integration with Linux Netfilter for capturing/dropping packets relying on the Linux firewall.
  • Extended and improved supported OSes: EdgeOS, Centos 6/7, Ubuntu 12.04/14.04, Debian, Windows x64, Raspbian (Raspberry)
  • Extended and improved supported architectures: x86, x86-64, MIPS, ARM.
  • Documentation and User Guide significanly improved
  • Added a great deal of READMEs, including ElasticSearch, bridging, traffic shaping and policing, NetBeans development
  • Improved stability both under normal and high network loads
  • Fixed many minor bugs

Interview with Luca Deri

$
0
0

For all our Italian-speaking friends, yesterday I have been interviewed by an Italian magazine. This is the link to the interview.

Enjoy!

Using nfsen-like Traffic Profiles in ntopng

$
0
0

One of the great features of nfsen is the ability to specify filters for identifying specific traffic and thus aggregate and graph it. In ntopng we aggregate traffic per host and networks. However sometimes you want to aggregate using other criteria. Examples include:

  • Traffic from host A to host B
  • VPN traffic sent from host X to concentrator Y
  • Facebook traffic sent from iPad 192.168.13.4
  • ntopng web traffic

In order to implement these measurements, in ntopng we have introduced the concept of network profiles. Each profile is defined using the “Traffic Profiles” entry of the preferences menu of ntopng professional.

Screen Shot 2016-02-06 at 08.23.19

The preferences page contains a list of profiles defined with name and filter.

Screen Shot 2016-02-06 at 08.23.44

Contrary to nfsen that used its own syntax, here we decided to use BPF (used in tcpdump and wireshark) to define profiles. We have extended it so that you can include also the l7proto statement that is used to characterise nDPI protocols. Once you have saved the protocol you can see stats about it from the interface stats.

Screen Shot 2016-02-06 at 08.31.28
Screen Shot 2016-02-06 at 08.31.38

or from the flow page where flows are marked with the profile name.

Screen Shot 2016-02-06 at 08.31.52

Using this feature you can aggregate the traffic the way you want, as long as you can define the profile using a BPF filter, thing that is pretty likely to happen.


Enjoy!

Monitoring BitTorrent Traffic with ntopng

$
0
0

ntopng has been designed not just for network administrators, but also for small companies and in particular for families. How often you have seen traffic on your network that you did not expect and you asked yourself what was that about. A good example is BitTorrent traffic that can be used for efficiently downloading files and not just for copyright-protected content (unfortunately this is how this protocol is usually perceived by the network community). If you are wondering what your colleagues/children are downloading using BitTorrent, now ntopng can help you.

In the latest development version, ntopng (thanks to nDPI) can not decode (and not just detect) BitTorrent traffic and extract the hashId of the files being searched/downloaded and tell you what is such file. Of course if you use -F this information is saved in MySQL so that you can run your queries on it.

In case you have BitTorrent traffic on your network you can check it from the interface stats

Screen Shot 2016-02-28 at 09.24.15

or looking at flows. As you can see in the info column you can see a hash

Screen Shot 2016-02-28 at 09.22.01

that is then displayed clicking on the Info blue button. In this case you will see the flow information and the BitTorrent becomes a clickable hyperlink,

Screen Shot 2016-02-28 at 09.22.14

If you are wondering how to map the hashId to a file name (so you can know what file has been downloaded), you can click on the hash hyperlink and google will tell you what is the file being downloaded.

Screen Shot 2016-02-28 at 09.22.20

Now you know how to monitoring your colleagues/children downloads and decide if they are appropriate or not.

Happy downloading!


Exploring Historical Data Using ntopng: Part 2

$
0
0

ntopng is able to deliver monitored traffic flows data to a MySQL server. We have already discussed how to configure ntopng to deliver this data in another blog post.

In this article we discuss the new features that allow you to dig deep into the flows dumped to MySQL using the ntopng web GUI. Earlier ntopng releases didn’t allow for thorough historical analyses and were only giving access to recorded flows and providing limited sorting features.
With the advances made in the latest ntopng Pro Small Business it is possible to drill-down historical flows and obtain, among other things:

  • Talkers
    • Historical IPv4 and IPv6 talkers;
    • The peers list of each talker, together with the amount of traffic exchanged with any peer;
    • The application protocols (layer 7) traffic exchanged between a talker and any of its peers.
  • Layer-7 Application Protocols
    • Historical layer-7 application protocols;
    • The talkers list of each application protocol, together with the amount of traffic that involves each talker;
    • The peers list that exchanged traffic with a talker using any given application protocol.

All the information pointed out above can be sorted using multiple criteria such as traffic exchanged, number of packets and number of flows. Moreover, the search criteria generated automatically while drilling-down the data can be saved and re-used directly in the future.

Additionally, it is possible to download raw flows or even pcap files matching the search criteria. Pcap files can be downloaded if an nBox with n2disk has been configured via ntopng preferences.

In the remainder of this post we show how to use the ntopng web GUI to dig deep into the recorded flows.
Drill-down features will only be available if ntopng was started with a properly configured MySQL database specified via the -F modifier. We refer the reader to this post for a detailed explanation.
Assuming ntopng has been properly started and instructed to export monitored flow data to MySQL, extra tabs will become available in the historical page of both interfaces and local hosts.


Chart Tab

The historical page shows in its default tab a chart of the data. The chart is clickable and zoomable to go back in time and select a time-span of interest.

01-n-historical-chart


IPv4 and IPv6 Flows Tab

On the right of the Chart tab there are four additional tabs. The first two visualize monitored flows in the selected time-span. If no IPv4 (IPv6) flows are present in the observation period, then the corresponding tab will be automatically hidden. And handy download button is available to fetch a pipe-separated txt file with all the flows.

02-n-browse-download-ipv4-flows

Talkers Tab

As soon as the Talkers tab is selected, a dynamic table with the talkers of the selected time-span is automatically loaded. By default, talkers are sorted based on the amount of traffic generated. Table columns are clickable to specify a custom sort order.

03-n-historical-talkers

Next to each talker there is an icon that can be clicked to inspect the peers that have exchanged traffic with the talker in the selected time period. The peers list loaded is sorted, by default, in a decreasing order of traffic exchanged.

04-n-historical-talkers-peers

The icon on the right of each peer can be clicked to inspect the Layer-7 application protocols that were used by the talker and the selected peer.

05-n-historical-talkers-peers-applications

Both the talker itself and the application protocols between any of its peers can be saved simply by clicking on the heart shown in the top breadcrumb. Saved items will be readily available in dropdown menus for future quick selections.

06-n-historical-talkers-favorites


Protocols Tab

A dynamic table showing Layer-7 application protocols, sorted by traffic volume, is loaded and shown as soon as the Protocols tab is selected. Different sort criteria can be selected by clicking on column headers.

07-n-historical-protocols
An icon it is shown on the right of every application protocol and can be clicked to drill-down the talkers that have used the application protocol. The resulting talkers list is shown in a table that, by default, is sorted according to the traffic volume.

08-n-historical-protocols-talkers

In order to go deeper and browse the list of peers that interacted with a talker using a given protocol, it suffices to click on any ‘double-arrow’ icon next to each talker. A new table with the peers list is shown.

09-n-historical-protocols-talker-peers

Layer-7 application protocol talkers and their peers lists can be saved by clicking on the heart icons shown in the navigation breadcrumb. Saved items will be shown in two dropdown menus.

10-n-historical-protocols-favorites

Advanced Flow Collection with ntopng and nProbe

$
0
0

In flow-based monitoring there are two main components: the probe (a.k.a. flow exporter) and the flow collector/analyser. Usually NetFlow/sFlow is a push mode paradigm as network devices have almost no memory/storage and thus they send out data as soon as possible towards a collector. This architecture is suboptimal as the probe is pushing the same data to all collectors (i.e. collector X cannot tell the probe that it is interested only to HTTP-based flows, but it has to collect everything and discard un-needed information) and also because in case a new collector has to be added, the probe has to be reconfigured (i.e. no dynamic attach/detach). Another issue is that data exchanged is in clear, meaning that anyone intercepting flows sent by the probe, can find out what happens in the monitored network; we are aware that you can setup a dedicated VLAN/VPN to avoid this but this practice adds complexity.

ntopng has reverted this paradigm using a poll-mode architecture.

PollMode

Via ZMQ ntopng dynamically subscribes to the probe, tells the probe what type of flow data it is interested in, and the probe sends ntopng only this information, without sending all flows to ntopng as probes do. This practice optimises network traffic and limits the CPU cycles to those really necessary to carry on to collect flows.

This architecture however is unable to operate in case of a NAT.

PushMode
In fact, in case you run the ntopng collector on a public IP (e.g. on a cheap VPS host) and nProbe on a private network, ntopng is unable to connect to the probe and thus flow collection won’t work.

In the latest development versions of ntopng and nProbe, we have introduced several enhancements to address these issues. In particular:

  • nProbe/ntopng can now operate both in pull/push mode.
  • Flow information is not compressed and (optionally) encrypted: your privacy is preserved even when sending traffic over the Internet.
  • ntopng now subscribes to nProbe for second-based throughput statistics, so that you will now see in ntopng realtime throughput statistics even if you configure the probe to aggregate flows to 1 min or more.

Let’s see how to use flow collection. Suppose that you run ntopng on host X and nProbe on host Y.

Poll Mode
host X> ntopng -i "tcp://Y:1234" --zmq-encrypt-pwd myencryptionkey
host Y> nprobe -n none --zmq "tcp://*:1234" --zmq-encrypt-pwd myencryptionkey
Push Mode
host X> ntopng -i "tcp://Y:1234" --zmq-collector-mode --zmq-encrypt-pwd myencryptionkey
host Y> nprobe -n none --zmq "tcp://*:1234" --zmq-probe-mode --zmq-encrypt-pwd myencryptionkey
Notes:
  • All the zmq options have a double dash “-“. Example –zmq .. –zmq-encrypt-pwd… etc.
  • The –zmq-encrypt-pwd is optional: if you set it data is encrypted with the specified symmetric key. In ntopng, in case you have configured multiple probes, the same encryption key is used for all probes (i.e. you cannot set a per-probe encryption key).
  • Flows are always sent in compressed format. Space savings can range from -30/-40% up to -90%.
  • ntopng now automatically subscribes to nProbe for 1 second traffic updates.

In ntopng you will now see an enhanced view of your probes, knowing not just traffic stats but also additional information such as remote probe IP (even if behind a NAT), the public IP from which flows are collected, and the interface speed being monitored by the probe.

nProbe Stats

In essence you can now see in realtime both your flows, traffic statistics and remote probe information. All using as little bandwidth as possible, protecting your flow information with encryption.

We believe that with these enhancements, we have created a very advanced flow-collection architecture, that addressed concerns of using the flow paradigm over the Internet and that gives users maximum flexibility now available with traditional probes/collectors.

How to Analyse MikroTik Traffic Using ntopng

$
0
0

MikroTik routers are pretty popular in particular in the wireless community and many users of the original ntop are familiar with it. With the advent of ntopng, we have decided to avoid natively supporting netflow in ntopng due to the many “dialects” a of the protocol and leave to nProbe the task to do the conversion of flows onto something ntopng can understand. For this reason the workflow is the one depicted below:

Mikrotik

The first thing to do is to configure NetFlow (both v5 and v9 are used) on the MikroTik that cane done from the command line or from the GUI. Suppose that both nProbe and ntopng are running on the same PC active at 192.168.8.20 and suppose that nProbe collect flows at port 2055. The configuration to use is

SBTIM@T~M3`$NCS2X5R{_@K

or if configured from the command line

/ip traffic-flow
set active-flow-timeout=1m enabled=yes
/ip traffic-flow target
add dst-address=192.168.8.20 port=2055 v9-template-timeout=1m

that should be reported as

[admin@MikroTik] > /ip traffic-flow print
              enabled: yes
           interfaces: all
        cache-entries: 64k
  active-flow-timeout: 1m
inactive-flow-timeout: 15s
[admin@MikroTik] > /ip traffic-flow target print detail
Flags: X - disabled
 0   src-address=0.0.0.0 dst-address=192.168.8.20 port=2055 version=9
     v9-template-refresh=20 v9-template-timeout=1m

At this point you need to start nProbe and ntopng on 192.168.8.20 as follows

nprobe -i none -n none -3 2055 --zmq tcp://127.0.0.1:1234
ntopng -i tcp://127.0.0.1:1234

nProbe will receive flows, convert them to ZMQ/JSON and send them to ntopng running on the same host. You can now access the ntopng GUI as http://192.168.8.20:3000 and see incoming flows.

Note that if you collect NetFlow:

  • Flows are emitted periodically (in the example above the flow are cut at 1 min max duration, and 15 sec idle timeout).
  • As traffic ingress is not constant as with packets (flows are received periodically) the network throughput at the end of the ntopng page is not smooth as it could be when capturing packets from a physical interface.

We remind you that nProbe requires a license (you can use the community edition of ntopng or the professional) that you can find on our shop, but if you belong to education or no-profit we give them for free.


Tweaking MySQL to Improve ntopng Flows Storage Space Usage

$
0
0

This is the first post that tries to give hints on how to tweak MySQL settings to better accomodate flows exported by ntopng. In particular, in this post it is discussed how to improve disk space usage. Hopefully, a series of posts with tips and tricks on how to improve responsiveness and reduce query time will be published in the future.

ntopng  MySQL flow export can be enabled using the -F command line option. Once enabled, it is possible to chose, from the web UI preferences panel, the number of days exported flows will be retained in MySQL. By default this value is set to 30 days. Users may chose to adjust this setting on the basis of their disk space availability and quantity of exported flows.

However, if MySQL is not configured properly, disk space usage may grow indefinitely even if old flows are constantly deleted. Indeed, flow deletion does not yield automatic disk space release, neither it ensures that newly arriving flows will take the place of the older, deleted flows.


innodb_file_per_table

To make sure disk space can be reclaimed and that new flows will take the place of deleted flows, innodb_file_per_table must be enabled.

To check whether innodb_file_per_table is enabled one can run the following command in a mysql shell

mysql> show variables like "innodb_file_per_table";
+-----------------------+-------+
| Variable_name         | Value |
+-----------------------+-------+
| innodb_file_per_table |  ON   |
+-----------------------+-------+
1 row in set (0.00 sec)

Please note that enabling innodb_file_per_table will not have effect on the already existing tables. Existing tables will need to be re-created using ALTER TABLE <table_name> ENGINE=InnoDB.

innodb_file_per_table is enabled by default on MySQL server >= 5.6.


Reclaiming Disk Space

Disk space can be reclaimed — provided that innodb_file_per_table is enabled — by running OPTIMIZE TABLE on the tables used by ntopng, namely, flowsv4 and flowsv6. OPTIMIZE TABLE will create, for each table it is run on, a new identical empty table. Then it will copy, row by row, data from the old table to the new one. In this process a new .ibd tablespace is created and the space is reclaimed. Optimizing the table is costly both in terms of time (a new table is created out of the old one) and in term of space usage (the new table needs to be fully created before the old one can be deleted). Therefore, optimizing a table is something that should be planned by — and agreed with — the DBA.


Reusing Disk Space

Disk space occupied by deleted flows is re-used automatically by newely arriving flows if using innodb_file_per_table. However, it should be noted that this may lead to fragmentation issues. Running an OPTIMIZE TABLE periodically will re-pack the flows in the most efficient way.


Closing Remarks

To improve ntopng flows MySQL space usage it is strongly recommended to enable innodb_file_per_table. However, even though new records will take the place of the deleted ones, it should be noted that disk space is not reclaimed automatically. This means that, for example, in an environment with an average of 1 million flows dumped to MySQL every week, setting a 7-days retention period will yield an approximately constant MySQL disk space usage — that is, the space required to accomodate 1 million flows. If, however, 2 million flows will be generated in a particular week, then the space will grow and will not be reclaimed automatically. From that point on, disk space usage will be large enough to accomodate 2 million flows even if an average of 1 million flows will be received in future weeks. Reclaiming disk space requires an OPTIMIZE TABLE on tables flowsv4 and flowvs6.

Announcing ntopng 2.4: Efficiency is Beauty

$
0
0

At ntop we are on a mission to develop enterprise-grade networking software, mostly open-source, and free of charge for no-profit/research organizations. Since our inception, we have been passionately and resiliently developing software to allow our users to monitor, protect, and preserve their network infrastructure. And we have been doing this in a relentless pursuit for the best and most efficient solution. We know that in the big-data era it is becoming increasingly easy to “add an extra appliance” — after all, it’s not that expensive — but this is not at the heart of our philosophy.

At the heart of our philosophy lies the belief that efficiency is beauty. Software must be light, optimized, and scalable enough to run on commodity hardware, pushing the “add an extra appliance” to a last resort. We believe that providing lighter, faster, and more scalable network monitoring software is the best way to deliver value to our users. We believe that such software is the catalyst for deploying enterprise-grade monitoring solutions at a fraction of the cost that would have come with conventional deployments. Software that can run seamlessly on top of commodity hardware, or even on virtual machines.

This beliefs have guided us through years of growth and innovation. During those years we released an interesting number of successful software products. ntopng is one of the most widely known tools we have developed so far. Its journey began many years ago under the name of ntop. The new generation status ng was earned a couple of years ago, when Luca Deri re-designed and re-implemented it ex-novo. Luca’s decision to entirely re-code the software was driven by the necessity to provide a modular, modern tool that could exploit the most recent web/scripting technologies. After months of intense coding ntopng was ready, and it turned out to be an exceptionally modular software composed of an heavy-lifting C/C++ core that interacts with Lua and Javascript to present results to the user via an intuitive web interface.

We have released many ntopng versions since then, each one with interesting improvements and significant new features. Today, we are proud to announce ntopng version 2.4.

This is version 2.4 from a feature perspective:

  • Memory-management, stability and speed have been fundamentally improved
  • We have kept an eye on security and hardened the code to prevent privileges escalation and XSS
  • Alerts have been extended to include support for
    • Re-arming to avoid raising trains of identical alerts in short periods of time
    • Alert propagation to the infrastructure monitoring software Nagios
    • CIDR-based triggers to monitor the behavior of whole networks
    • The detection of suspicious probing attempts
  • Netfilter support has been added together with optional packet dropping features
  • Routing visibility is now possible through RIPE RIS
  • Availability of fine-grained historical data drill-down features, including top talkers, top applications, and interactions between hosts (more details here)
  • Integrations with other software
    • LDAP authentication support
    • alerts forwarding/withdrawal to Nagios
    • nBox integration to request full packet pcaps of monitored flows
    • Data export to Apache Kafka
  • We have extended and improved traffic monitoring
    • Visibility of TCP sessions throughput estimations and state breakdown (e.g., connections established, connections reset, etc.)
    • Goodput monitoring
    • Trends detection
    • Highlight of low-goodput flows and hosts
    • Visibility of hosts top-visited sites
  • Built-in support is now included for
    • GRE detunnelling
    • per-VLAN historical statistics
    • ICMP and ICMPv6 dissection
  • We have extended the set of supported OSes to include: Ubuntu 16, Debian 7, EdgeOS
  • There is also an optional support for hosts categorization via service flashstart.it

We encourage you to play with ntopng version 2.4. Review it, test it out, open an issue on GitHub, or send us an email. Binary packages are available for many distributions including CentOS 6 and CentOS 7, Debian jessie and wheezy, Ubuntu 12/14/16, Raspbian and Windows. If you are more interested in the source code, then you should visit our GitHub page.

Viewing all 209 articles
Browse latest View live